A trendy, practical guide to choosing the perfect zodiac jewelry: signs, colors, stones, and handmade...
0
Carrello della spesa
0 prodotti
Search in blog
Blog categories
Latest posts
Life in shades of grey? No thanks.
Read more
Read More
In an increasingly grey-scale world, this article invites you to put color back into circulation with style and...
Vip Room. Guide to Tessiland’s most dangerous live shopping.
Read more
Read More
Discover what Tessiland’s VIP Room is: the Tuesday live at 5:00 PM where you’ll find previews, creative kits, and...
Toffee Bag: the caramel bag for late winter 2026
Read more
Read More
The crochet Toffee Bag is late winter 2026’s caramel bag: a cozy-chic design with a faux-fur detail, clean lines, and...
Valentine’s Day crochet: 3 projects to make and gift.
Read more
Read More
A mini magazine-style guide to celebrate Valentine’s Day with crochet: 3 projects made by us and paired with...
Popular posts

Crochet bags, the models for spring-summer.
One of the most searched accessories on the web, patterns, tutorials, ideas, projects, accessories, here's how to...
Read more

Crochet bags for spring summer 2024. 5 models of handmade sling bags.
Discover the latest trends for Spring/Summer 2024 with our exclusive guide to 5 crochet sling bag models. Perfect for...
Read more

The Crochet Net Bucket Bag: A Trendy Accessory for 2024
Learn how to make a crochet net bucket bag with our simple and detailed tutorial. Use elastic cord, a size 5 crochet...
Read more

Crochet rugs, a passion that is becoming a trend.
In this article, dive into the art of crochet rugs and discover how to create unique and personalized pieces for your...
Read more

From runways to street style: the trendiest crochet bags.
Are you also passionate about handmade items and want to create your own capsule collection of crochet bags? Here are...
Read more

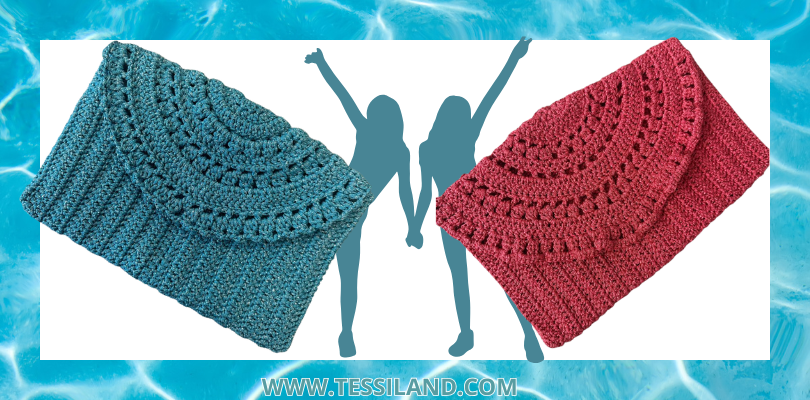
The coolest clutch of summer 2025 — and you can make it in 2 must-have colors. Chiedi a ChatGPT
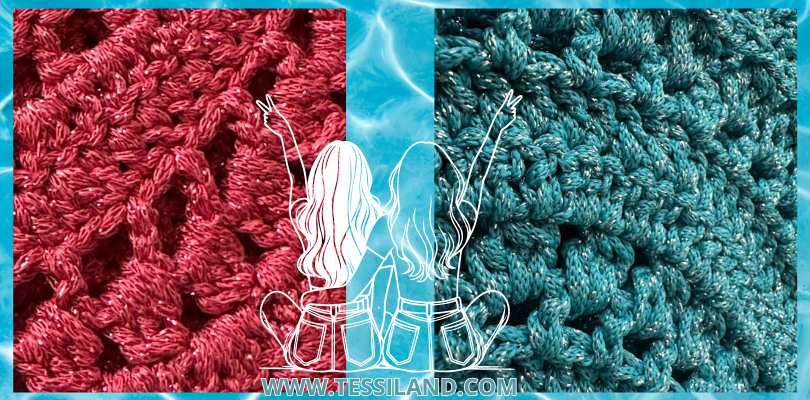
You know those inseparable friends, different but perfectly in sync?
Well, this is the story of two handmade clutches — one in Poppy Red, named the color of summer 2025 — and the other in a turquoise shade that whispers of the coast, mojitos, and wind in your hair.
Two sister clutches, designed to be flaunted in duo with your BBF (Best Bag Forever, of course), or to create stunning looks from morning till night.
And the best part? You can make them yourself, stitch by stitch, with your crochet hook and a pinch of creative time.
Why you’ll love this summer crochet clutch
It’s not your typical beach bag.
It’s the detail that turns a white dress into a full outfit. It’s the perfect match for seaside cocktails or a boho garden ceremony.
Plus, it has everything a true maker adores: color, trend, and uniqueness.
- Poppy Red, for those who love to stand out.
- Turquoise, for those who dream of diving in — even just with their eyes.
- A simple shape, with expert-level details (like the three double crochets closed together stitch).
- Just one magnetic button, and you’re done.
How to make the BBF crochet clutch
Spoiler: you can make it even if you’re a beginner. All you need is 2 spools of SublimeLux or KingLux (or Poppy Red, if you like to be bold).
Materials you’ll need
- 2 spools of SublimeLux (color of your choice – see the range here)
or 2 spools of KingLux (color of your choice – see the range here)
- Crochet hook size 4 mm
- Stitch markers
- 1 magnetic button
- Yarn needle and scissors
- sublimelux kinglux
- crochet hooks stitch markers
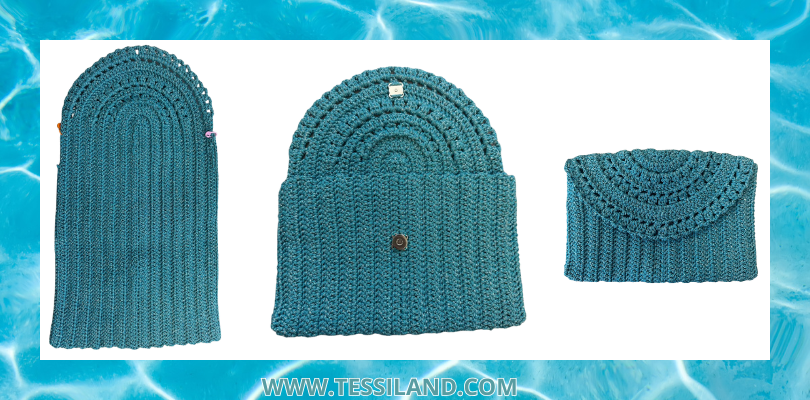
Step-by-step: the full tutorial
A solid base, a soft shape, and a chic detail.
This is how you build a clutch that’s destined to become your summer 2025 favorite.
Start with the rectangular base
Row 1: Work 64 CHAIN STITCHES + 2
Row 2: Work DOUBLE CROCHETS IN EVERY STITCH – in the last stitch, make 5 double crochets (place markers in stitches 2 and 4), turn and continue with double crochets in every stitch. At the end of the row, chain 2 and turn the work.
Row 3: Work 64 double crochets. At the marked stitch, work 2 double crochets and place a marker on the first. In the next stitch, work 3 double crochets. In the next marked stitch, work 2 double crochets and place a marker on the second. Continue with 64 double crochets, chain 2 and turn.
Row 4: Work 64 double crochets. In the marked stitch, work 2 double crochets and the same in the next two. In the center stitch, work 1 double crochet. In the following 3 stitches, work 2 double crochets each, placing a marker on the last. Continue with 64 double crochets, chain 2 and turn.
Row 5: Work 64 double crochets. At the marker, make: 1 increase, 1 dc, 1 increase, 1 dc, 1 increase, 1 dc. In the central stitch: 1 dc, 1 dc, 1 increase, 1 dc, 1 increase, 1 dc, 1 increase. Insert the marker. Continue with 64 double crochets, chain 2 and turn.
Add the “wow” detail
Row 6: Work 64 double crochets. At the marker, chain 1 and place the marker in the chain. In the next stitch, work 1 double crochet. Continue [1 chain – 1 dc] until the next marker. Then 64 double crochets, chain 2 and turn.
Row 7: Work 64 double crochets. At the marker, make 3 dc closed together, chain 2. Skip a stitch and repeat in the next: [3 dc together, chain 2], until the next marker. 64 double crochets, chain 2 and turn.
Row 8: Work 64 double crochets. From the marked stitch, count 14 stitches. In the next one, make an increase (this will be the central point). Continue with double crochets to the end, chain 2 and turn.
Row 9/10: repeat rows 6 and 7
Row 11/12: repeat row 8
Row 13: repeat row 6
Row 14: Work 64 double crochets. At the marker, make 3 dc together, chain 3. Skip one stitch and repeat in the next: [3 dc together, chain 3] until the next marker. Finish the row with 64 double crochets and fasten off.
Finishing and closure
Move the markers along the sides to the 6th stitch on each side. This will help you know where to stop the single crochet edge and where to fold the bag.
Work single crochet along the edges to finish.
Fold the bag in half and sew the sides. Finally, sew on the magnetic button.
Beautiful things are made with hands, but they start from the heart.
And this clutch proves that all you need is a crochet hook and a shared idea to create magic.
Rosaria Tessiland®
.jpg)

Leave a comment